Tuesday, August 31, 2010

Two 4 Tuesday - Getting Ready for Xmas!

Two for Tuesday features 2 projects that are similar in either color, theme, layout or embellishment but... with a different twist!


Hi everyone,

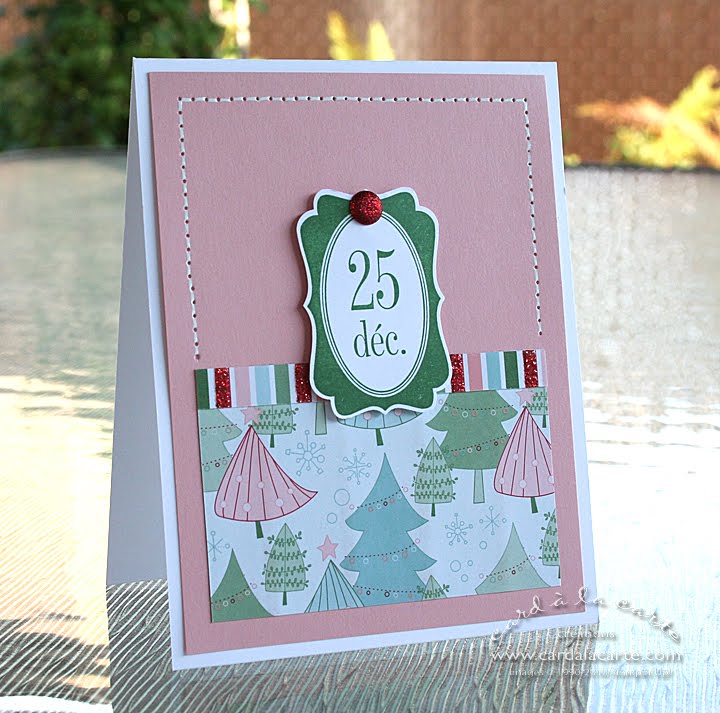
It's official; the Christmas projects have started. Gen and I are busy preparing fun stuff for you guys. Today was turn to come up with a 2-for and I decided to use my brand spankin' new products from the upcoming Holidays Mini Catalogue from Stampin' Up! (one of the perks of being a demo is that we get to order before our customers -- wweeee!). Those products will be available on Wednesday, Sept. 1st.

Here's a card and a tag, using the same exact products with the exception of the embellishment -- one's a glitter brad, the other one is a ribbon:


Look at that cute paper?!!!! I love it! It's called Candy Cane... can't go wriong with a name like that. The label is also new from a stamp set called Tags 'til Christmas. Oh! and that new Decorative Label Punch that fits perfectly around the stamped image, leaving a white border!!!! Yeah, I'm in love. The brad is also new and is glittery!!! We lurv glitter!

And because I couldn't resist, I shot a close-up of the card outside from underneath the gazebo while Stuuph and a friend were swimming in the pool... it's 30 degrees Celsius outside and Mommy is making Christmas projects :-) The contrast was too tempting to resist.


Have nice stampin' day !!! CeeCee

Stamp Set: Tags til Christmas, En attendant Noël
Inks: Garden Green
Cardstock: Whisper White, Blushing Bride, Baja Breeze, Candy Cane DSP
Punches: Decorative Label Extra-Large
Ribbon: Real Red 1/4" Grosgrain
Other: Glimmer Brights Brads in Real Red, Uni-ball White Gel Pen, Mat Pack and Paper-Piercing Tool, Stampin' Dimensionals, SNAIL Adhesive
To order any of these supplies, click here.

Monday, August 30, 2010

Quickie Mini Monday -- Back to school !!

Quickie Mini Mondays feature a 10 minute-or-less project -- something fast, fun and easy to reproduce and mass produce.


Hi everyone,
here's a card really fast and easy to reproduce for all the teachers that you love.


I colored the bus with my markers to make it fast, I draw the hill free hand and then cut it , since I didn't have any back to shcool sentiment , it's handwritten (another fast way to have exactly what you need).
Have a nice stampin' day!!
Gen

Stamp Set: Every Little Bit

Inks: Chocolate Chip Pad, Real Red , So Saffron and Old Olive Markers
Cardstock: Whisper White, Real Red, so Saffron, Play date DSP
Other:  Sending Love Epoxy Brads, Stampin' Dimensionals, SNAIL Adhesive

To order any of these supplies, click here.

Friday, August 27, 2010

Sparkly Fun Friday -- Wedding enveloppe

Sparkly Fun Fridays features a sparkly or glittery project using shimmer paints, embossing powders, glitters, rhinestones... anything shiny to welcome the weekend in a fun way!!!


Hi everyone,
Today's card was commisionned by my friend who needed a wedding card in which she could insert money. To add a little to the challenge, since the wedding was black and white themed, she wanted the card to reflect that theme... So here's what I came up with :


I decided to design an enveloppe so that the money would fit inside in a little pocket where she can still write her wishes to the newly weds.


To make it a little more classy and sophisticated, I added some little half back pearls on the end of the spirals of the patterned paper, that's my little sparkly touch.


Hope she likes it.

Have a nice stampin' weekend!!
Gen

Stamp Set: It's a stretch

Inks: Basic Black, Basic Grey

Cardstock: Whisper White,  Pattern Paper (Chatterbox)

Punches: 1-1/4" , 1" circles

Other: Big Shot, Bigz scallop square die, Textured Impressions Percfect Polka Dots Embossing Folder, Jewels classic pearls, Stampin' Dimensionals, SNAIL Adhesive, Glue Dots, Sticky Strip

To order any of these supplies, click here.

Thursday, August 26, 2010

Sweet Treat Thursday -- Tuxedo After Eight

Sweet Treat Thursdays are all about food -- our other favorite topic -- and features ways to embellish/wrap/present something edible. CAUTION: May be hazardous to your waistline!


Hi everyone,

I dedicate today's project to my daughter, Stuuph (not her real name but a nickname). We were out shopping together yesterday and came upon a box of After Eight Singles... you know the ones that are ONLY 80 calories per bar but you end up eating the whole box?!... yeah, those!

Anyhoo, on the box there was a picture showingone of the Singles with the paper ripped open. She looked at the picture and said: "oh, look... it looks like the chocolate is wearing a tuxedo!" And thus was born my inspiration for today's project.


I took out 2 of the chocolates, measured, and came up with a box pattern. I wanted the flap to tuck into the tuxedo jacket so it took me a while to figure out the measurements. But I persevered and after having scrapped 3 sheets of cardstock I finally got it. I knew exactly what paper I was going to use; it's retired but is perfect for a black tie affair.


This is an open view of the box. As you can see the bow tie (a piece of black satin ribbon) is glued to the top flap. When it's closed, the closure has a smooth finish that I love. Very neat and tidy...  classy!


Love the Rhinestones Jewels! So perfect for the cufflinks.

Up next?! Why, the ladies version of course :-) But you'll have to wait 2 more weeks :-)

Have a nice stampin' day !! CeeCee


Cardstock: Whisper White, Basic Black, Rockabilly DSP (retired)
Punches: Photo Corners,  Corner Rounder, Straight Corner (retired)
Ribbon: Basic Black 5/8" Satin, Basic Black 1/4" Grosgrain
Other: Newtrals Designer Button in Basic Black,  Basic Rhinestones Jewels, Stampin' Dimensionals, SNAIL Adhesive, Mini Glue Dots, Sticky Strip
To order any of these supplies, click here.

Wednesday, August 25, 2010

Whatever Challenge Wednesday -- Mojo Monday 153

Whatever Challenge Wednesdays features a challenge from the blogosphere, chosen randomly.
Here's our pick for this week:


Hi everyone,

We're playing with Mojo Monday #153 this week. The sketch is the one below:


I have to admit that the color combination I chose is not my usual, but I also wanted to challenge myself. I used Stampin' Up!'s Color Coach and looked up "Daffodil Delight"... one of the color combination on the back was Daffodil Delight, Early Espresso and Cherry Cobbler.


It's a pretty simple card, quick to execute but I quite like it. You'll find a list of the supplies below.

Have a nice stampin' day! CeeCee

Stamp Set: Cute by the Inch, Pocket Silhouettes (sentiment)

Inks: Early Espresso, Daffodil Delight

Cardstock: Whisper White, Cherry Cobbler, Daffodil Delight, Neutrals Patterns DSP Stack

Punches: 1-1/4" Square Large, Word Window

Ribbon: Daffodil Delight 5/8" Satin

Other: Regals Designer Button in Cherry Cobbler,  Brights Brads in Daffodil Delight, Stampin' Dimensionals, SNAIL Adhesive, white thread (non SU)

To order any of these supplies, click here.

Tuesday, August 24, 2010

Two 4 Tuesday -- Happy 1st Birthdays

Two for Tuesday features 2 projects that are similar in either color, theme, layout or embellishment but... with a different twist!


Hi everyone,

Remember this card ??? I just love it so much, that when I stumble over it last night, I new I had to CASE myself and give this sketch a new purpose with the Nursery Suite Speciality DSP.

Since I have a two first birthdays coming up, I though I should do both of them at the same time, here's the baby boy version:


And here's for the girl , I really love the fact that this pack of paper can really do both:


The round sentiment is from Crazy for cupcake.


The number 1, was done with my Big Shot and the alphabet simple numbers die, while the teddy is from every little bit stamp set. I just colored the teddies real fast with Classic ink and a blender pen.

Have a nice stampin' day!
Gen

Monday, August 23, 2010

Quickie Mini Monday -- Magnetic Owl Bookmark

Quickie Mini Mondays feature a 10 minute-or-less project -- something fast, fun and easy to reproduce and mass produce.

Hi everyone,

Today's Quickie Mini IS a quickie mini... mini-mini :-) I needed a new bookmark after having dropped my favorite one in the bathtub (yeah, I read there). So I figured if the bookmark were magnetic, there would be no danger of it falling in the water!


Stampin' Up!'s Magnetic Sheets are perfect for that. Aaaaaand.... you can cut through them with your Big Shot Die-Cutting Machine! I used the Two Tags Die to cut through the magnetic sheet, cardstock and DSP.  I stamped the little owl from the Aviary stamp set in Pacific Point, punched it out and matted it with 2 different sizes of circle. I added some Crystal Effects over the eyes.


After I cut out all my pieces, I folded the cardstock and DSP in half.  As for the magnetic tag, I cut it in half because folding it would not have worked. I made sure I cut shorter to allow the cardstock to fold nicely. I love how easy it was to line everything up because it was cut from the same die.


The little ribbon makes it easy to find the bookmark in your book. Easy-peasy project!


Have a nice stampin' day! CeeCee


Stamp Set: Aviary (#120462)

Inks: Pacific Point Classic (#111837)

Cardstock: Bashful Blue (#105120), Real Red (#102482), Pear Pizzazz (#119715), Whisper White (#100730), Celebrations DSP (#117164)

Punches: 1" Circle Medium (#119868), 1-1/4" Circle Large (#119861), 1-3/8" Circle Large (#119860), Two Tags Bigz Die (#115954)

Ribbon: 1/4" Real Red Grosgrain (#109034)

Other: Magnet Sheet (#119816), Crystal Effects (#101055), Stampin' Dimensionals (#104430), SNAIL Adhesive (#104332),  Mini Glue Dots (#103683), Big Shot Die-Cutting Machine (#113439)

To order any of these supplies, click here.

Sunday, August 22, 2010

Quick Tip of the Week -- a small change

Hey everyone,

Just a little peek-a-boo in here to let all our Newsletter Subscribers know that we've modified our Quick Tip of the Week to go out on Wednesdays from now on (instead of Sundays). So, do not worry if you don't get anything in your email box today... it's coming on Wednesday!

For those of you who don't know what we're talking about, the Quick Tip of the Week is just that -- a quick tip we send to you every week via email. To get this and other great benefits, just sign up to our mailing list by click in the box at the upper right corner of this blog and enter your email addy. It's as easy as that!

We'll be back tomorrow with our regular posts!
CeeCee

Friday, August 20, 2010

Sparkly Fun Friday -- Owl Wedding Anniversary Card

Sparkly Fun Fridays features a sparkly or glittery project using shimmer paints, embossing powders, glitters, rhinestones... anything shiny to welcome the weekend in a fun way!!!

Hi everyone,

Aren't they adorable?! I just thought that two owls on a branch in front of moonlit stars could be perfect for a wedding anniversary card.

For this card, I mainly used Stampin' Up!'s Two-Step Owl Extra-Large Punch. I had so much fun with it, choosing different patterns for each of them. The sentiment is from an old retirement stamp set (of which I forget the name). The card base is Early Espresso cardstock.

The glitter part is on the moon... After I cute the circle, I covered the Whisper White cardstock with VersaMark Ink, sprinkled Iridescent Ice EP over it then heated it with my Heat Tool. As usual, the picture does not show the glitter all too weel. But if you click on the picture, you'll get a bigger view and maybe :-) a glimpse fo the glitter.


Have a nice stampin' day! CeeCee

Wednesday, August 18, 2010

Sweet Treat Thursday -- My Little Book of Stamps

Sweet Treat Thursdays are all about food -- our other favorite topic -- and features ways to embellish/wrap/present something edible. CAUTION: May be hazardous to your waistline!


Hi everyone,

What I have to share with you today is not a sweet treat but a treat to ME. I've been wanting to do an inventory book of all my stamps for quite a while now, and this week was my deadline. Since I'll be back to work soon (maternity leave will be over soon) I really need to get things done to reduce my TO DO list!! So here's my inventory book:


It uses Play date DSP along with coordinating CS in So Saffron, Old Olive, Tempting Turquoise, Real Red and Chocolate Chip, lots of Whisper White paper and a couple o buttons. As I mentioned earlier it took me a week to do it, I had to ink-stamp-clean every single stamp I own and sometimes twice to organize them in their proper sections (all sentiments togheter). But I really believe it was so worth the effort -- no more searching throught dozens of boxes for the right sentiment or image. Efficency, Yeah!!
Something that also took a long time is the crystal effect on the letters, there is 5 coats and I let each of them dry overnight eventhough it's was long, I think it's the thing I like the most its ULTRA SHINY AND THICK so yummy!! Did you see my FAUX-CHIPBOARD letters ?? Curious on how I made them ?? It will be our next quick tip of the week. If you're interested in receiving this tip and other informative emails with exclusive content, all you have to do is subscribe by typing your email address in the box found in the upper right-hand corner of this page
Have a nice stampin' day!
Gen

Whatever Challenge Wednesday -- So cute baby boy

Whatever Challenge Wednesdays features a challenge from the blogosphere, chosen randomly.
Here's our pick for this week:

Hi everyone,

This week I played with 2 challenges, Taylored expressions sketch Challenge #124:


Here's my interpratation of those 2 challenges combine in one clean and cute baby boy card:


I used So cute stamp set with Elegant soirée DSP. Baja Breeze and Peach Parfait CS and ink along with some vanilla twine and a punched border from SU! dotted scallop ribbon border.


Have a nice Stampin' day!
Gen

Tuesday, August 17, 2010

Two 4 Tuesday -- Birthday Wishes in Marina Mist

Two for Tuesday features 2 projects that are similar in either color, theme, layout or embellishment but... with a different twist!


Hi everyone,

First of all, let me apologize for the colors... it is supposed to be Marina Mist which is a little "grayer" than the color you see here. But for some reason, that's how it came out!

Here are my 2 cards for today. Two birthday cards, two different orientations, but using the same color scheme and stamp sets.

I'm so in love with Stampin' Up!'s yummy buttons this year. Here, I'm using the Marina Mist from the Subtles Designer Buttons Collection (#119745). The polka-dot paper is from the Subtles Patterns DSP Pack (#117152). For the card above, I colored an image from the Just Believe Stamp Set (#120453) with Wild Wasabi (#120975) and Marina Mist (#119679) Stampin' Write Markers. The sentiment in the middle of the frame is from level 3 hostess stamp set, Occasional Quotes (#120142), and stamped in Basic Black Classic Ink (#101179) using the Stamp-a-ma-jig (#101049) for perfect alignment.

Above, I changed the orientation of my card and used a different image from the Just Believe stamp set. This card has more of a romantic feel to it compared to the first card.

Oooooh, would you look at that ribbon?! It's the new Seam Binding Ribbon in Very Vanilla that I dyed with a few drops from the Marina Mist Classic Stampin' Ink Refill (#119787). Love it!!! It's retro-chic and so easy to tie and dye. Unfortunately, you'll have to wait until September 1st to order the Seam Binding Ribbon... it comes out with the Holidays Mini Catalog which is AWESOME!!! I know... I'm teasin' yah :-)

This time, I added a touch of pink with a Regal Rose Stampin' Write Marker (#105108) and some bling around the frame with my 2-Way Glue Pen (#100425) and Dazzling Diamonds Stampin' Glitter (#102023).

Have nice stampin' day! CeeCee

Don't forget to sign up to our Newsletter (upper right corner) to get all the goodies in your email box! It's quick and easy and will not fail to inspire you.