Friday, July 30, 2010

Sparkly Fun Friday -- Dazzling crystal flower and a hint...

Sparkly Fun Fridays features a sparkly or glittery project using shimmer paints, embossing powders, glitters, rhinestones... anything shiny to welcome the weekend in a fun way!!!

Hi everyone,


What happens when Dazzling Diamonds meet Crystal Effects ??? Something VERY sparkly and shiny, let me tell you. For those of you with sensitive eyes, please do wear sunglasses before you read anything more...


Ok, can you tell I just received some new Stampin' Up! toys.... oh yeah!!!

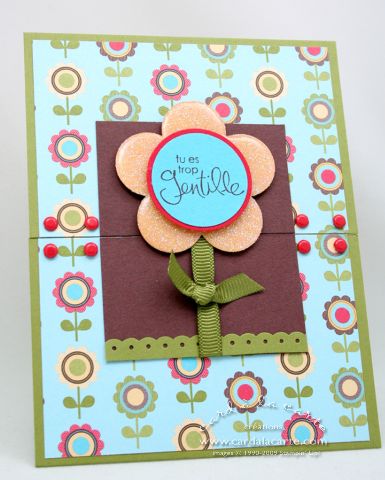
New DSP (designer series papers--patterned papers, to answer some questions!!), new punch, new stamps, new colors and that means new IDEAS of course!!! For this card, I used my brand new Play Date DSP with its coordinating colors : So Saffron, Chocolate Chip, Old Olive, Real Red and Tempting Turquoise.

For the flower, extra large fancy flower punch, 1 3/8" and 1 1/4" circle punches and old olive 1/4" gros-grain ribbon. As for the grass, my new Dotted scallop ribbon border punch did the job perfectly.


For the Sparkly Fun part, I first covered a So Saffron fancy flower with Versamark, then added Heat and Stick Powder, heat set, sprinkled some Dazzling Diamond glitter and heat set again. Finally, I covered the whole flower with two coats of Crystal Effects, I love this stuff, besides the drying time (hate to have to wait !!) but this time (as usual) it was so much worth the wait. Lookie :


But wait there's more !!

HAHAHA I just had to do it, sorry ;O)

Watch what happens when you open it , TADA!! A slider card. Do you want a HOW TO tutorial to be able to make tons of these ??

Seriously, they're very easy to make.

Ok, I didn't tell you but MAYBE if you sign-up for our FREE Monthly Card à la Carte newsletter then MAYBE the free BONUS tutorial will help you achieve something similar, MAYBE ;O).

But wait there's still more... If you sign-up before Sunday, August 1st at 11:59 p.m. (Eastern Time). You will be eligible to win one of the two Cute 'n Cubby that will be drawn for 2 lucky subscribers. Winners will be announced in next Tuesday's post. To subscribe, type in your email address in the sign-up box in the right-hand column.Those who have already subscribed will be automatically entered in the draw -- no need to subscribe again.

Good Luck everyone and happy stampin' day!!

Gen

Thursday, July 29, 2010

Sweet Treat Thursday & Contest! -- Cute 'n Cubby & Chocolate?!

Sweet Treat Thursdays are all about food -- our other favorite topic -- and features ways to embellish/wrap/present something edible. CAUTION: May be hazardous to your waistline!

SCROLL ALL THE WAY DOWN FOR THE CONTEST !!!


Hi everyone,

Oooh, I'm having so much fun finding all kinds of different uses for the Cute 'n Cubby! It was only natural that I turned to my big love for CHOCOLATE!!! Check this out:

I'm lucky enough to have a Lindt factory outlet near my house (or is that a bad thing?!). Anyways, I went "grocery shopping" and came across those cute little chocolate sticks. They just called to me -- I couldn't resist!

They fit perfectly well in the pockets of the Cute 'n Cubby and makes a very fun way to give to a friend in need of a picker-upper!

The flower in the middle was made with the following punches (all from Stampin' Up! - click here to order):
  • Two-Step Bird Extra-Large (#117191)
  • Fancy Flower Extra-Large (#118073)
  • 1-1/4" Circle Large (#119861)
  • 1-3/8" Circle Large (#119860)
  • Scallop Square Bigz Clear Die for the Big Shot (#115950) -- for the Cute 'n Cubby
  • Big Shot Die-Cutting Machine (#113439)
I used Pacific Point, Tempting Turquoise and Whisper White cardstock for the flower and the leaves are Old Olive.

The top of the flower was made so that it swivels to reveal a tiny handwritten message inside. Simple and fun! Only one brad is functional, for the swivel action; the rest are decorative and go through the white circle only.

HEY .....?!

AND NOW.... for the contest.

As you may have noticed, you can now sign-up to receive the
FREE Monthly Card à la Carte newsletter and other goodies!

As a thank you to our subscribers,
Gen & I have decided that we would draw
2 Cute 'n Cubbies and ship them out to
two lucky subscribers.

All you have to do to be eligible is type in your email address
in the sign-up box below or in the right-hand column to be eligible.
(those who have already subscribed will be automatically entered in the draw -- no need to subscribe again)


Email Newsletter icon, E-mail Newsletter icon, Email List icon, E-mail List icon
Sign up for our Email Newsletter


For Email Newsletters you can trust


The contest ends Sunday, August 1st at 11:59 p.m. (Eastern Time).
The 2 lucky winners will be announced in Tuesday's post.

Good luck everyone and have a nice stampin' day! CeeCee

Wednesday, July 28, 2010

Whatever Challenge Wednesday -- CPS #177

Whatever Challenge Wednesdays features a challenge from the blogosphere, chosen randomly. Here's our pick for this week:


Hi everyone,

We're keeping it simple today and the Card Positioning System Challenge #177 helped tremendously. Check out this layout:


The minute I saw it, I thought... "Fresh Cut Notes" !!! Of course, the middle accent of this square layout is almost identical with the die-cut shape on a Stampin' Up!'s Fresh Cut Note (#111882)!

I knew from the start that I wanted to use one of the gorgeous Antique Brads (#117273) in the middle of the flower shape. I stuck a small scallop punch, I punched out a piece of Marina Mist cardstock to mat the brad.

I kept the rest simple by using a piece of Greenhouse Gala DSP (#117167) behind the die-cut shape, using Stampin' Dimensionals (#104430) to adhere it to the inside of the card. Then I stamped a small greeting from the Tiny Tags Stamp Set (#118592) with Basic Black ink (#101179) on Marina Mist cardstock (#119682) and punched it out using the Jewelry Tag Medium Punch (#117190). Then I just added a strand of white floss and tied it around the middle brad.

Challenges are fun and get your mojo going. Try one today!

Have a nice stampin' day! CeeCee

Monday, July 26, 2010

Two 4 Tuesday

Hi everyone,

Did you see our new CUTE 'N CUBBY tutorial ???.They're so much fun to make I just can't stop making them, here are my last two:


One for make-up, I was really surprise as to how much it holds


Everything as a place and everything is in its place so that I can rapidly find all I need when in a hurry.


I really love to be organize, it's my way of having more time than everybody in a day!!


Here's the second one for everything nails:


What I do love about this particular one is that before, I usually brought everything in front of the tv, and when I was all set, I realized that I was missing something... But now, I just bring the whole CUTE 'N CUBBY with me and I'm sure I absolutely have everything I need, and as a bonus, I never lose something in between the cushions because I just put back everything in its place.

I think one of my favorite feature about the CUTE 'N CUBBY is that it is FOLDABLE, so even in travels, I always have everyting in its place, so I don't lose time searching. What a great gift for all your travelling family, friends , co-workers and most of all for YOU!!


** Pour toutes nos bloggeuses francophones, le tutoriel est aussi diponible en FRANÇAIS ici.

Have a nice stampin' day!
Gen xxx


Quickie Mini Monday -- an inch of bubble gum

Quickie Mini Mondays feature a 10 minute-or-less project -- something fast, fun and easy to reproduce and mass produce.

Hi everyone,

I LOVE so much my new stamp set from the new catalogue, it's called Every little bit and all the images fit into a 1 inch punch, either round or square and most of them are outline stamp so I can color them, just too cute. As soon as I saw the little bubble gum machine, I had to have it. So here's my fast card for today.


I dusted off my Bali breeze DSP...Yes, I know, it's some very old paper, but I still love it and I think it fit perfectly with the colorful gums.


A little bit of ribbon, a sentiment from teeny tiny wishes, a couple of markers, a blender pen and a white gel pen so easy...


Since it was so cute, I couldn't help it but to make multiples...
Have a nice stampin' day!
Gen


Friday, July 23, 2010

Announcing a new Tutorial: the Cute 'n Cubby!


 It's decorative, practical, portable and cute. And it's so easy to do! Introducing the

Cute 'n Cubby


The organizer cube Cute 'n Cubby measure approximately 4" all around and can be used to store a plethora of small and medium-sized objects that you want to keep close at hand, such as:
  • stamping supplies
  • crafting supplies
  • coloring pencils, pens, markers
  • make-up
  • small cooking utensils and tools
  • small notebooks and writing pads
  • office supplies
  • and much more...


The 5-page tutorial, complete with photos, will take you step-by-step through the process of making your very own Cute 'n Cubby. You don't need an expert seamstress to make one; this level of tutorial is for any beginner and all other levels! And since the whole thing is made using a straight stitch, you don't need a fancy sewing machine. What's more? It can be done under an hour!

Since the fabric is cut using Stampin' Up!'s Scallop Square Bigs Clear Die (#115950) for the Big Shot, this seriously reduced the amount of time it would normally take to prep for this project. Imagine the fun you'll have using fabric of all kinds of color and pattern!


And because the Cute 'n Cubby folds back into a neat little package, it's totally portable. Bring it with you at your next demo and put it in the center of the table filled with all the tools you'll need for your projects. It's more than an organizer -- it's a sales tool as well! What better way to get your customers excited about the Big Shot by showing them all the possibilities it offers -- cutting paper AND fabric.

Want a neat gift idea for your family and friends? Why not offer them a Cute 'n Cubby so they can organize their supplies in a fun and decorative way!

To buy the Cute 'n Cubby English tutorial for 11.95$ CAD, please click the Add To Cart button below!

Thursday, July 22, 2010

Sweet Treat Thursday --Homemade with love

Sweet Treat Thursdays are all about food -- our other favorite topic -- and features ways to embellish/wrap/present something edible. CAUTION: May be hazardous to your waistline!

Hi everyone,

Today was a fun day for Card à la carte, CeeCee came to my place (I usually always go to hers) so that we could "work" all day... Well we had our lunch at la Piazzetta, it's was soooooooooo yummy, then we played, oupps worked a lot. after that we had our supper and this!!

My favorite dessert, raspberry frozen mousse with raspberry coulis...yumm. As I was looking for a container to store and serve the coulis, I found this empty bottle of chocolate sirup... Hummm I teared off the label, but the bottle was now very, very sticky...hummmm Let's do a sweet treat thursday with it, so I just pulled out some paper to match my cake (old SAB), did a little tag and added a ribbon, and voilà!! much more nicer and lot less sticky that before. the cake and coulis were even more delicious ;O), never forget that presentation is usually half the eating experience!!


Are you curious??Wanna see what were so busy doing today and these last few weeks???

Sorry, I think I took too much of a close-up with this photo ;O) !!!
Come back this weekend I promise I'll get you better photos!!


Have a nice Stampin' day!


Gen

Wednesday, July 21, 2010

Whatever Challenge Wednesday -- FTL #99

Quickie Mini Mondays feature a 10 minute-or-less project -- something fast, fun and easy to reproduce and mass produce.


Hi everyone,


Today I decided to play with the sketch challenge from Clean and Simple stamping with their FLT #99. Here's the sketch:


Here's my take on this challlenge:


I used my old and beloved It's a Stretch stamp set, I was very surprised when SU! decided to retire it, Oh well, I'm keeping it for sure. I colored it with Old Olive, Tempting Turquoise and So Saffron Classic ink with a blender pen to match the Island Oasis DSP. The main image was mounted on a 3X6 tetured Soft Suede card base. Sentiment is again from Teeny Tiny Wishes.


I loved so much how it turned out that I made four of them.


Have a nice stampin' day!
Gen

Tuesday, July 20, 2010

Two 4 Tuesday -- From Old Man to Snowman

Two for Tuesday features 2 projects that are similar in either color, theme, layout or embellishment but... with a different twist!

Hi everyone,

Yeah, you didn't dream it. This is a snowman above. I went from a pretty simple sketch and a stamped image of an old man for card that someone commissioned me for to a Christmas card!

In this case, I think the patterned paper (old Chatterbox from my stash) dictated the switch between the 2 themes. The greens and browns are perfect for a masculine card but when you add red buttons, you can easily visualize a perfect Xmas combo!

This stamped image is from a retired stamp set called Golden Oldies and I just love the good-natured sentiment. Perfect for a humorous card.
This one is from the Punch Pals Stamp Set. The coloring is kept to a minimum but it works. Sometimes, less is more!

Have nice stampin' day! CeeCee